I built a retro console for my kids some time ago and they asked me if they could have one but that was portable.
Now that I finished the retro handheld console, thought that could be useful to share how it was done in case others wanted to replicate.
Hardware
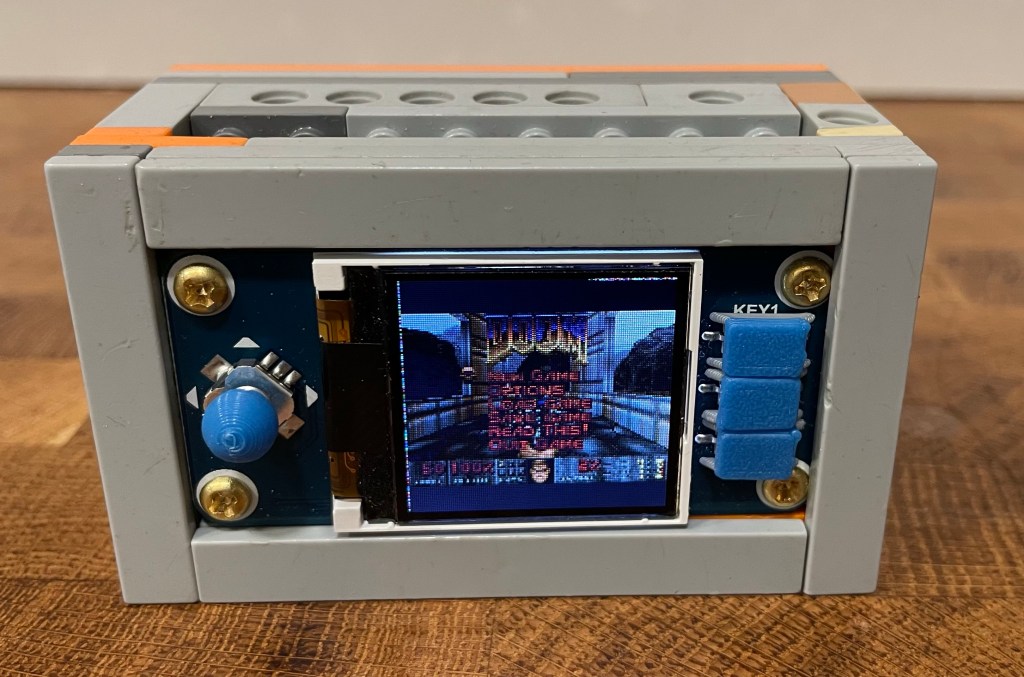
I used a Waveshare 128×128, 1.44inch LCD display HAT which is a good fit because it contains both a LCD display and GPIO keys that can be used as a gamepad.
The board is a HAT for the Raspberry Pi Zero 2W board, HATs are expansion boards whose connectors are compatible with the RPi Zero 2W pinout.
And that is all the hardware needed if the console will just be powered with a micro USB cable. But it is of course more fun to make the handheld portable and for that I used the Waveshare UPS HAT.
Software
I just used a stock Fedora Server image for this project, no additional software was needed than what is already packaged in the distro.
The image can be flashed using the arm-image-installer tool. There is no support for the RPi Zero 2W but since is quite similar to the RPi3, that can just be used as the target instead, i.e:
sudo arm-image-installer --image=Fedora-Server-36-1.5.aarch64.raw.xz \
--target=rpi3 --media=/dev/$device --addkey=id_rsa.pub --norootpass --resizefs
Where $device is the block device for the uSD card used to install the OS.
Then I followed these steps:
-
Boot the uSD card, go through Fedora initial setup, create a
retroarchuser and make it member of thevideoandinputgroups. -
Install a Libretro emulator (i.e: mGBA for Game Boy Advance) and the Retroarch frontend.
sudo dnf install libretro-mgba retroarch
- Create a user service to run the game.
$ mkdir -p ~/.config/systemd/user/
$ cat > ~/.config/systemd/user/retroarch.service
<< EOF
[Unit]
Description=Start Doom
[Service]
ExecStart=retroarch -L /lib64/libretro/mgba_libretro.so /home/retroarch/roms/doom.zip
Restart=always
[Install]
WantedBy=default.target
EOF
- Enable the service and lingering for the retroarch user, the latter is needed to allow the service to start at boot even when the user was not logged in.
$ systemctl --user enable retroarch.service
$ sudo loginctl enable-linger retroarch
- Add RPi config snippets to support the LCD and GPIO keys.
Two Device Tree Blob Overlays (DTBO) are used to drive the SPI controller of the LCD panel and the GPIO keys. These are adafruit-st7735r.dtbo and gpio-key.dtbo.
The overlays support options that can be configured in the RPi config.txt file such as the pins used, display resolution, if the display has to be rotated, the input event code that has to be reported for each GPIO key and so on.
For the HAT mentioned above, the following has to be added to the /boot/efi/config.txt file:
# Enable SPI
dtparam=spi=on
# TFT LCD Hat
dtoverlay=adafruit-st7735r,128x128,dc_pin=25,reset_pin=27,led_pin=24,rotate=90
# GPIO keys configuration
# Directional pad (KEY_UP, KEY_LEFT, KEY_RIGHT, KEY_DOWN, BTN_ENTER)
dtoverlay=gpio-key,gpio=6,active_low=1,gpio_pull=up,label=UP,keycode=103
dtoverlay=gpio-key,gpio=5,active_low=1,gpio_pull=up,label=LEFT,keycode=105
dtoverlay=gpio-key,gpio=26,active_low=1,gpio_pull=up,label=RIGHT,keycode=106
dtoverlay=gpio-key,gpio=19,active_low=1,gpio_pull=up,label=DOWN,keycode=108
dtoverlay=gpio-key,gpio=13,active_low=1,gpio_pull=up,label=PRESS,keycode=28
# Buttons (KEY_X, KEY_Z, KEY_A)
dtoverlay=gpio-key,gpio=21,active_low=1,gpio_pull=up,label=KEY_1,keycode=45
dtoverlay=gpio-key,gpio=20,active_low=1,gpio_pull=up,label=KEY_2,keycode=44
dtoverlay=gpio-key,gpio=16,active_low=1,gpio_pull=up,label=KEY_3,keycode=30
- Workaround a bug in the
st7735rdriver that prevents the module to be auto loaded.
There is a bug in the st7735r driver which causes the module to not be loading automatically. To workaround this issue, create a modules-load.d config snippet to force the module to be loaded:
$ echo st7735r | sudo tee /etc/modules-load.d/st7735r.conf
Unfortunately this is a quite common bug in SPI drivers. But for this particular driver the workaround should not be needed in the future since it was already fixed by this commit. But at the time of this writing, the Fedora version used (36) still does not contain the fix.
- Prevent the
simpledrmdriver to be initialized.
The firmware seems to add a "simple-framebuffer" Device Tree node even when there is no monitor connected in its mini HDM port. This leads to the simpledrm driver to be probed, so it needs to be denied listed using a kernel command line parameter:
$ sudo grubby --update-kernel=DEFAULT \
--args=initcall_blacklist=simpledrm_platform_driver_init
- Update the
adafruit-st7735r.dtboto the latest version.
This was the only change I needed in Fedora 36. The issue is that the adafruit-st7735r.dtbo overlay is for the legacy fb_st7735r driver instead of the DRM st7735r driver. The latter has a different Device Tree node property to specify the display rotation and so the rotate=90 option specified in the config.txt file will be ignored.
$ wget https://github.com/raspberrypi/firmware/raw/master/boot/overlays/adafruit-st7735r.dtbo
$ sudo mv adafruit-st7735r.dtbo /boot/efi/overlays/
Happy gaming!

When you get a chance, check out the MiSTer FPGA project. They don’t quite have a public recipe for a hand-held but, the MiSTer Multisystem folks have a hand-held project in the works.
Pingback: How to troubleshoot deferred devices issues in Linux | Blog | Javier Martinez Canillas